Most people know that you can’t see text on a screen while it is blacked out, but they don’t know that blacking out your iPhone, iPad, or Android is straightforward. It’s easier than most people think, and once you learn how to do it, you’ll be surprised at how much you can accomplish.
In this article, we will be talking more about it.
Contents
How To Uncover Blacked Out Text (From An Image That You Think Is Secure To Send Someone)
Before getting into the question, let us learn why it is necessary to black out texts?
We live in a world where one tap on a phone screen can either help you or destroy you. So it is apparent that we care about our privacy more than anything. Hence, before sharing anything on the phone, we rub out vital information such as our card numbers, contact information, or passwords.
But do you know that if anyone wants, they can uncover the blackened texts?
Markup tools and editing apps help cover important texts, but that too is not entirely safe. It mostly obfuscates and makes it opaque.
Thicker strokes make the marker work as a highlighter. A highlighter is a known tool for rapid obfuscation. However, the opaqueness does not allow the human eyes to see what’s written.
The marker we use to cover the text is not a solid marker but a highlighter that highlights the texts in a single stroke. If you want to make the text invisible, you must rub it continuously.
How to see blacked out text?
With a few sliding motions of your finger, the effect layers become non-transparent, creating a solid line that conceals sensitive information or whatever is beneath it. In addition, the marker can be modified to reveal the sensitive information it is hiding for colors such as black and white.
Below given are the ways to ensure your privacy:
Using the Markup Tools to Black Out Text
Now let’s experiment with the whole idea. If you have the picture with some hidden portion, then proceed with that; if not, follow the steps to know further. Firstly take a picture and use the highlighter from the markup tools to highlight the portion you want to hide. Then take a screenshot and click on the thumbnail to open it from the files or the photo apps.
Next, select the highlighter tool, which looks like a thick marker. You can adjust the opacity and thickness of the highlighter. Tap the highlighter by ensuring that the slider is positioned to the right. Now, select the black color for hiding your data because that is the safest and the most Opaque choice.
Then continuously stroke the picture with the highlighter and make it completely invisible. Add layers of highlighter to your text to make it non-prominent. When you are finished, save the image in the files.
Getting Rid of Image Highlighter Obfuscation
So in this part, first, you open a picture in the Photos app where the vital information is hidden. Now click on the edit option present in the top right corner. Now few options will appear before you. Remember one thing, the number of strokes added to hide the text will determine the effort you have to give to uncover it.
So at the bottom of the page, a few specific options will be presented before you. Make sure to put the brightness, shadows, and brilliance at 100 percent. If it still appears vague, then go for making exposure, highlights, and contrast 100 percent.
See what happens if you try these out:
- 100 percent brilliance
- 100 percent shadows
- 100 percent brightness
If you’re still having trouble figuring out what’s going on, try one or all of the following:
- 100 percent exposure
- 100 percent highlights
- 100 percent contrast
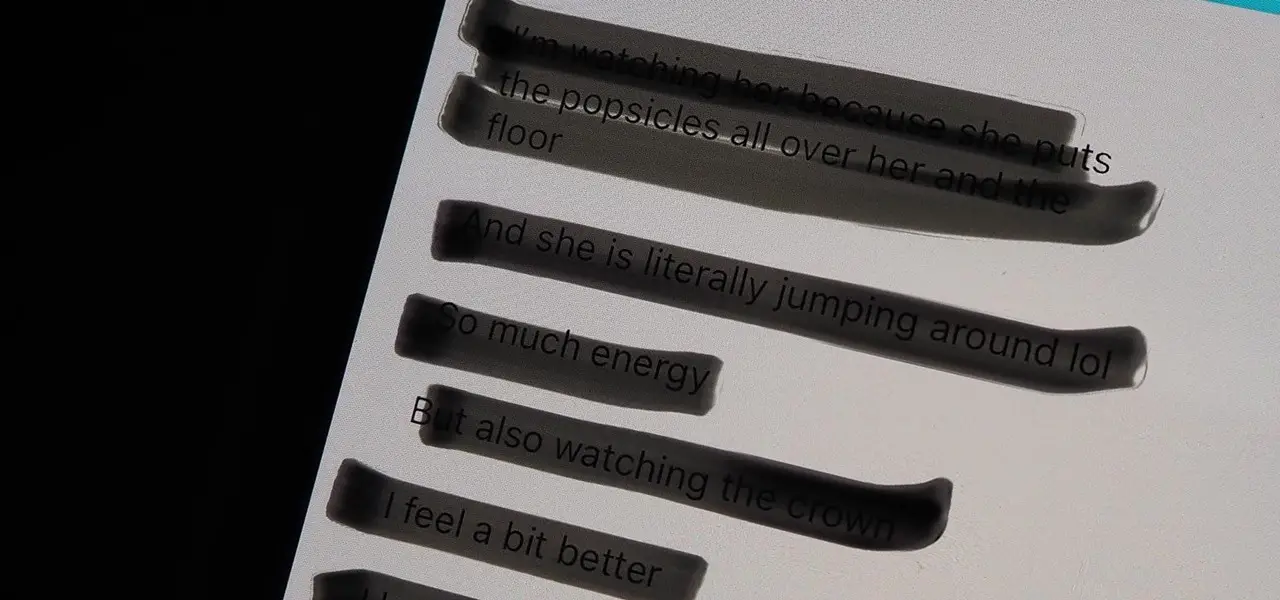
You will see that the hidden portion is becoming slightly transparent. You can zoom in to get a clear view, although it depends on what is hidden underneath. You might be able to figure it out, but the result may not always satisfy you. For example, seeing things hidden under a black marker will be a little more complicated.
Another thing that matters is the number of layers of highlighter used to hide. If it’s lighter, you may be able to figure it out at the start of the steps mentioned above. You wouldn’t have to follow all the steps to get the result.
The difficulties don’t end here. If the text is hidden with a light color highlighter and the background is also light, it will be challenging to figure out. On the other hand, if a dark highlighter is used on a lighter color background, it is effortless.
Making it more difficult for others to reveal your personal information
Do not worry about using the markup tools because there are ways to hide your private information. It is possible for the data you are hiding to disappear forever. Follow these steps to know-how.
1st Tip: Increase the number of highlighter layers.
Now you have already understood this trick. What you have to do is when you are using the highlighter to hide the text, then use multiple strokes to hide it. Not in a continuous rubbing, do it one after the other. In this way, add several layers. Only then will the editing tools not be able to figure out the hidden texture.
Tip 2: Highlight specific settings pages using a highlighter.
If you are using the markup tool on an iPhone, then the data is safe with the help of IOS, so there’s nothing to be worried about. But if you are using the editing tools of the Photos app rather than the screenshot editor, you have to be a little careful.
For example,
- Go to Settings
- Got to General on the “About” tab
- Then try rubbing the information you want to hide, such as your IMEI.
The IOS won’t intervene in doing it once, but if you continue doing it multiple times, the iOS will understand that you want this information to be hidden. Then it will guide you further in doing it. Sometimes it works after two strokes only.
Screenshots in Settings’ “Passwords” (OS 14) and “Passwords & Accounts” (iOS 13) instantaneously eliminate the password from the page – a handy security feature. If you swipe three or four times, the username can be obscured.
Tip 3: Instead, use the Pen Tool.
In Markup, you will find a pen tool, which is nothing but a marker that gives a solid effect. A single stroke of any color will help you hide the information. Any use of editing tools or the human eye will be unable to figure out what is hidden beneath. The only thing that will make it work is adding several strokes of it on the data as it is thin. If the strokes are not that layered, then if someone wants, they can see the hidden info. So if you want to conceal the data more robustly, then the use of a highlighter is appropriate.
Tip 4: You might also use the Shape Tool.
There is another markup tool that you can use, which is the shape tool. Please tap on the + button in the bottom right corner and choose between the shapes now take that shape and place it on the text you want to hide. So what you can do is:
Don’t use a thin line. Instead, try using a thicker line with the help of the Arrow tool to fill in the square, circle, and comment box so that everything has a solid color. You can switch the color if you want.
Nothing can make a person see what’s hidden under those shapes.
Tip 5: Hide Personal Information with a Third-Party App
Using professional software is a secure option to conceal your data. Professional tools with the help of blur options hide the sensitive data and can also disappear the location metadata from the picture and with that no one will be able to find the actual location of the picture even with Everest Pipkin’s image scrubber. You may find several options but this is the best if you use this one.
Can you undo a markup on an iPhone?
Markups can be deleted one by one when you are using the markup photo editing extension.
Choose the graphic you want to delete and press the delete key.
After you have saved the changes, Exit the extension, and go for making the additional adjustments, the markups will be burned in .27 abr.
How to read blacked out text?
Watch this short video to understand how to do it:
So we already are aware of the fact that blackening of text is essential to protect our sensitive data. Through Freedom of Information Act requests, one can easily procure sensitive information if it is not properly hidden. Therefore if you hide it properly then it can’t be redacted.
Open the image processing programs like photoshop Or GIMP and add the redacted file. Look for the option of “layers” in GIMP to see the number of layers used for editing. Then choose the black rectangles Delete the black rectangles by selecting them. Information like this may still be manipulable if the image was saved in a format that preserved this kind of image information, such as the “.psd” format in Photoshop.
Select the text from one side of the blacked portion area to the other side. With the help of authentic channels, acquire the original document. Only if you have the right to procure the document, then you will be able to.
Note: Anything done without legal authorization is considered to be illegal. So if you are trying out to uncover any text without legal authorization, make sure to get approval.
Frequently Asked Questions (FAQs)
An image or photo can be enhanced with editing tools that have adjustment settings to reveal the hidden textures. With an image editing tool, that you can use to adjust brightness, contrast, shadow, exposure, highlight, contrast, saturation, hue, sharpness, and brilliance.
What is the best color to use in Pen Tool?
To hide your texture, content, or information from an image or screenshot, you can use any color in a pen tool. The pen tool must be used with 100 percent opacity. Doing so will make the resulting texture will be harder to detect.
How can I hide texture from images using an application or web tool?
It is possible to permanently and professionally mask texture in an image using either an application or web tool. With a trusted third-party app, however, hiding or revealing texture would be much easier.
Final thoughts
What is the best way to reveal or hide the texture of a picture or screenshot? I hope to have answered this question by now.
A screenshot or image’s texture can be permanently hidden by multiple layers, pen tools, or shapes, and it is better to hide the texture permanently. If you have any more doubts or queries, leave them in the comments below.